1.9 KiB
Flip-Flop
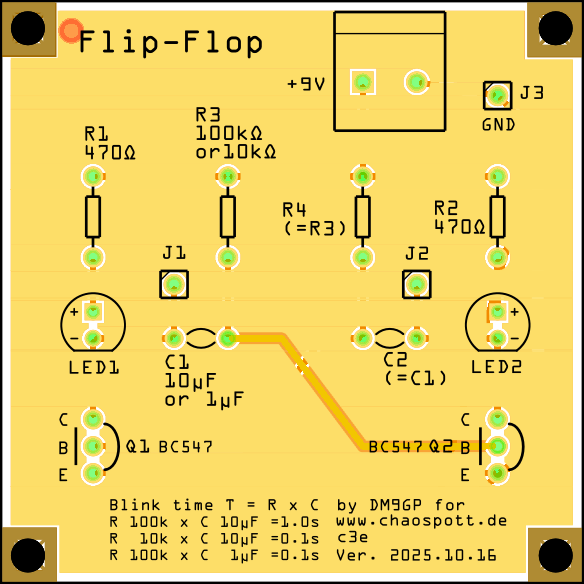
Astable Flip-Flop Circuit PCB.
Blinks, but also makes square waves.
A great candiate for a soldering workshop becuase it is gratifying with the blinking LEDs. There is more. It creates a square wave that can be observed with an oscilloscope. Also, even if sinus waves are preferred for producing radio frequency (RF), the project is a very good entry point into exploring oscillators, a corner stone in generating RF.
Parts required to make the flip-flop circuit are: 2x LEDs; 2x 10 μF capacitors; 2x 470 Ohm resitors; 2x 100 kOhm resistors; 2x BC547 transistors;
Fritzing files can be print by yourself or you can have the circuit board printed for you for a fee, for example by uploading the .fzz file to https://aisler.net/
Included are also Gerber Files (.zip) for printing by other board manufacturers, like JLCPCB (jlcpcb.com) for example.
Attached are images and a file that can be opened in the Fritzing software (from https://fritzing.org/) to view the schematics, inspect or modify the circuit if desired. Fritzing also generates a breadoard view, a picture of which is also attached: the project can be made without a PCB.
Q1 and Q2 are the BC547 transitor. Alternatilvy the equivalent 2N2222A can be used, it has slightly more gain than the BC547. However, the 2N2222A will have to be mounted rotated 180 degrees as it's pin out is the other way round than that of the BC547.
The blinking interval is determined by the values of the two 100kOhm resistors and that of the two capacitors as per the formula: T = R x C
Example values: 100 kOhm x 10 μF = 1.0s; 10 kOhm x 10 μF = 0.1s; 100 kOhm x 1 μF = 0.1s;
you can choose LEDs of any color.
J1, J2, J3 are optional. Use them to pick up the square waves and display them on a oscilloscope. J3 is ground.
This work is dedicated to the public domain.
