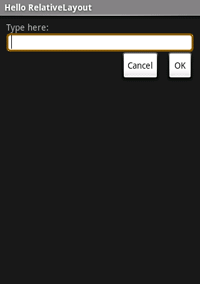
{@link android.widget.RelativeLayout} is a {@link android.view.ViewGroup} that displays child {@link android.view.View} elements in relative positions. The position of a {@link android.view.View} can be specified as relative to sibling elements (such as to the left-of or below a given element) or in positions relative to the {@link android.widget.RelativeLayout} area (such as aligned to the bottom, left of center).
A {@link android.widget.RelativeLayout} is a very powerful utility for designing a user interface because it can eliminate nested {@link android.view.ViewGroup}s. If you find yourself using several nested {@link android.widget.LinearLayout} groups, you may be able to replace them with a single {@link android.widget.RelativeLayout}.
res/layout/main.xml file and insert the following:
<?xml version="1.0" encoding="utf-8"?>
<RelativeLayout xmlns:android="http://schemas.android.com/apk/res/android"
    android:layout_width="fill_parent"
    android:layout_height="fill_parent">
    <TextView
        android:id="@+id/label"
        android:layout_width="fill_parent"
        android:layout_height="wrap_content"
        android:text="Type here:"/>
    <EditText
        android:id="@+id/entry"
        android:layout_width="fill_parent"
        android:layout_height="wrap_content"
        android:background="@android:drawable/editbox_background"
        android:layout_below="@id/label"/>
    <Button
        android:id="@+id/ok"
        android:layout_width="wrap_content"
        android:layout_height="wrap_content"
        android:layout_below="@id/entry"
        android:layout_alignParentRight="true"
        android:layout_marginLeft="10dip"
        android:text="OK" />
    <Button
        android:layout_width="wrap_content"
        android:layout_height="wrap_content"
        android:layout_toLeftOf="@id/ok"
        android:layout_alignTop="@id/ok"
        android:text="Cancel" />
</RelativeLayout>
Notice each of the android:layout_* attributes, such as layout_below,
layout_alignParentRight, and layout_toLeftOf. When using a {@link
android.widget.RelativeLayout}, you can use these attributes to describe
how you want to position each {@link android.view.View}. Each one of these attributes define a
different kind
of relative position. Some attributes use the resource ID of a sibling {@link android.view.View}
to define its own relative position. For example, the last {@link android.widget.Button} is
defined to lie to the left-of and aligned-with-the-top-of the {@link android.view.View}
identified by the ID ok (which is the previous {@link android.widget.Button}).
All of the available layout attributes are defined in {@link android.widget.RelativeLayout.LayoutParams}.
public void onCreate(Bundle savedInstanceState) {
    super.onCreate(savedInstanceState);
    setContentView(R.layout.main);
}
The {@link android.app.Activity#setContentView(int)} method loads the
layout file for the {@link android.app.Activity}, specified by the resource
ID — R.layout.main refers to the res/layout/main.xml layout
file.
You should see the following layout:
