Using the Google Maps library, you can create your own map-viewing Activity. In this tutorial, you'll create a simple map application in two parts. In Part 1, you'll create an app that shows a map the user can pan and zoom. In Part 2, you'll add overlay items that mark points of interest.
This tutorial requires that you have the external Google Maps library installed in your SDK environment. The Maps library is included with the Google APIs add-on, which you can install using the Android SDK and AVD Manager. To learn how, see Adding SDK Components.
After installing the Google APIs add-on in your SDK, set your project properties to use the build target called "Google APIs by Google Inc.". See the instructions for setting a build target in Developing in Eclipse with ADT or Developing in Other IDEs, as appropriate for your environment.
You will also need to set up a new AVD that uses the same Google APIs deployment target. See Android Virtual Devices for more information.
For reference material, see the Google Maps library documentation.
AndroidManifest.xml
file and add the following as a child of the <application> element:
<uses-library android:name="com.google.android.maps" />
<manifest> element:
<uses-permission android:name="android.permission.INTERNET" />
<activity android:name=".HelloGoogleMaps" android:label="@string/app_name"
     android:theme="@android:style/Theme.NoTitleBar">
res/layout/main.xml file and add a single
{@code com.google.android.maps.MapView} as the root node:
<?xml version="1.0" encoding="utf-8"?>
<com.google.android.maps.MapView
    xmlns:android="http://schemas.android.com/apk/res/android"
    android:id="@+id/mapview"
    android:layout_width="fill_parent"
    android:layout_height="fill_parent"
    android:clickable="true"
    android:apiKey="Your Maps API Key goes here"
/>
The android:clickable attribute defines whether you want to allow
user-interaction with the map. If this is "false" then touching the map does nothing.
The android:apiKey attribute holds the Maps API Key for your
application, which proves your application and signer certificate has been registered with the
Maps service. This is required in order to receive the map data, even while you are
developing. Registration to the service is free and it only takes a couple
minutes to register your certificate and get a Maps API Key.
Go now to get a key. For instructions, read
Obtaining a Maps API
Key. For the purpose of this tutorial, you should register
with the SDK debug certificate, which will only be valid while your application is signed
with the debug key (once you sign with your private key, you will need a new API key).
When you get your key, insert it for the value of android:apiKey.
HelloGoogleMaps.java file. For this Activity, extend
{@code MapActivity} (instead of {@code android.app.Activity}):
public class HelloGoogleMaps extends MapActivity {
This is a special sub-class of {@link android.app.Activity}, provided by the Maps library, which provides important map capabilities.
isRouteDisplayed() method is required, so
override this method:
@Override
protected boolean isRouteDisplayed() {
    return false;
}
This method is required for some accounting from the Maps service to see if you're currently displaying any route information. In this case, you're not, so return false.
@Override
public void onCreate(Bundle savedInstanceState) {
    super.onCreate(savedInstanceState);
    setContentView(R.layout.main);
}
This loads the layout file created above. In fact, this is now a workable application that will display map tiles and allow the user to pan around the map. But there's no ability to zoom. Fortunately, there's a very simple zoom feature built into the {@code MapView} class, which you can summon with {@code setBuiltInZoomControls(boolean)}. Do this at the end of the {@link android.app.Activity#onCreate(Bundle) onCreate()} method:
    MapView mapView = (MapView) findViewById(R.id.mapview);
    mapView.setBuiltInZoomControls(true);
So, now you have a map, but in many cases you'll also want to create your own map markers and lay-overs. That's what you'll do now. In order to do so, you must implement the {@code ItemizedOverlay} class, which can manage a whole set of {@code Overlay} (which are the individual items placed on the map).
HelloItemizedOverlay that implements
{@code ItemizedOverlay}.
When using Eclipse, right-click the package name in the Eclipse Package Explorer, and select New > Class. Fill-in the Name field as HelloItemizedOverlay. For the Superclass, enter "com.google.android.maps.ItemizedOverlay". Click the checkbox for Constructors from superclass. Click Finish.
OverlayItem {@link java.util.ArrayList}, in which you'll put
each of the OverlayItem objects you want on the map. Add this at the top of the
HelloItemizedOverlay class:
private ArrayList<OverlayItem> mOverlays = new ArrayList<OverlayItem>();
HelloItemizedOverlay constructors. The constructor must
define the default marker for each of the {@code OverlayItem}s. In order for the {@link
android.graphics.drawable.Drawable} to actually get drawn, it must have its bounds defined. Most
commonly, you want the center-point at the bottom of the image to be the point at which it's
attached to the map coordinates. This is handled for you with the {@code boundCenterBottom()}
method. Wrap this around our defaultMarker, so the super constructor call looks like this:
public HelloItemizedOverlay(Drawable defaultMarker) {
  super(boundCenterBottom(defaultMarker));
}
public void addOverlay(OverlayItem overlay) {
    mOverlays.add(overlay);
    populate();
}
Each time you add a new {@code OverlayItem} to the ArrayList, you must call
populate() for the {@code ItemizedOverlay}, which will read each of the
{@code OverlayItem}s and prepare them to be drawn.
populate() method executes, it will call createItem(int) in
the {@code ItemizedOverlay} to retrieve each {@code OverlayItem}. You must override this method to
properly read from the ArrayList and return the {@code OverlayItem} from the position specified
by the given integer. Your override method should look like this:
@Override
protected OverlayItem createItem(int i) {
  return mOverlays.get(i);
}
size() method to return the current number of
items in the ArrayList:
@Override
public int size() {
  return mOverlays.size();
}
public HelloItemizedOverlay(Drawable defaultMarker, Context context) {
  super(defaultMarker);
  mContext = context;
}
This passes the {@code defaultMarker} up to the default constructor to bound its coordinates and then initialize {@code mContext} with the given {@link android.content.Context}.
Then override the {@code onTap(int)} callback method, which will handle the event when an item is tapped by the user:
@Override
protected boolean onTap(int index) {
  OverlayItem item = mOverlays.get(index);
  AlertDialog.Builder dialog = new AlertDialog.Builder(mContext);
  dialog.setTitle(item.getTitle());
  dialog.setMessage(item.getSnippet());
  dialog.show();
  return true;
}
This uses the member {@code android.content.Context} to create a new {@link android.app.AlertDialog.Builder} and uses the tapped {@code OverlayItem}'s title and snippet for the dialog's title and message text. (You'll see the {@code OverlayItem} title and snippet defined when you create it below.)
You're now done with the HelloItemizedOverlay class and can start using it
to add items on the map.
Go back to the HelloGoogleMaps class. In the following procedure, you'll create an
{@code OverlayItem} and add it to an instance of the HelloItemizedOverlay class, then
add the HelloItemizedOverlay to the MapView using a {@code GeoPoint}
to define its coordinates on the map.

res/drawable/ directory of your
project.List<Overlay> mapOverlays = mapView.getOverlays(); Drawable drawable = this.getResources().getDrawable(R.drawable.androidmarker); HelloItemizedOverlay itemizedoverlay = new HelloItemizedOverlay(drawable);
All overlay elements on a map are held by the {@code MapView}, so when you want to add some,
you have to get a list from the getOverlays() method. Then instantiate the {@link
android.graphics.drawable.Drawable} used for the map marker, which was saved in the {@code
res/drawable/} directory. The constructor for {@code HelloItemizedOverlay} (your custom {@code
ItemizedOverlay}) takes the Drawable in order to set the default marker for all overlay
items.
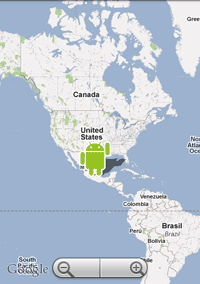
GeoPoint point = new GeoPoint(19240000,-99120000);
OverlayItem overlayitem = new OverlayItem(point, "Hola, Mundo!", "I'm in Mexico City!");
{@code GeoPoint} coordinates are specified in microdegrees (degrees * 1e6). The
{@code OverlayItem} constructor accepts the {@code GeoPoint} location, a string for the
item's title, and a string for the item's snippet text, respectively.
itemizedoverlay.addOverlay(overlayitem);
mapOverlays.add(itemizedoverlay);
You should see the following:
When you tap the overlay item, you'll see the dialog appear.
Because the {@code ItemizedOverlay} class uses an {@code java.util.ArrayList} for all of the
{@code OverlayItem}s, it's easy to add more. Try adding another one. Before the
addOverlay() method is called, add these lines:
GeoPoint point2 = new GeoPoint(35410000, 139460000);
OverlayItem overlayitem2 = new OverlayItem(point2, "Sekai, konichiwa!", "I'm in Japan!");
Run the application again. (You probably need to move the map to find the new overlay item.)