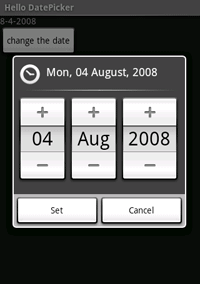
To provide a widget for selecting a date, use the {@link android.widget.DatePicker} widget, which allows the user to select the month, day, and year, in a familiar interface.
In this tutorial, you'll create a {@link android.app.DatePickerDialog}, which presents the date picker in a floating dialog box at the press of a button. When the date is set by the user, a {@link android.widget.TextView} will update with the new date.
res/layout/main.xml file and insert the following:
<?xml version="1.0" encoding="utf-8"?>
<LinearLayout xmlns:android="http://schemas.android.com/apk/res/android"
    android:layout_width="wrap_content"
    android:layout_height="wrap_content"
    android:orientation="vertical">
    <TextView android:id="@+id/dateDisplay"
        android:layout_width="wrap_content"
        android:layout_height="wrap_content"
        android:text=""/>
    <Button android:id="@+id/pickDate"
        android:layout_width="wrap_content"
        android:layout_height="wrap_content"
        android:text="Change the date"/>
</LinearLayout>
This creates a basic {@link android.widget.LinearLayout} with a {@link android.widget.TextView} that will display the date and a {@link android.widget.Button} that will open the {@link android.app.DatePickerDialog}.
HelloDatePicker.java and add the following members to the class:
    private TextView mDateDisplay;
    private Button mPickDate;
    private int mYear;
    private int mMonth;
    private int mDay;

    static final int DATE_DIALOG_ID = 0;
The first group of members define variables for the layout {@link android.view.View}s and the
date items. The DATE_DIALOG_ID is a static integer that uniquely identifies the {@link
android.app.Dialog} that will display the date picker.
    protected void onCreate(Bundle savedInstanceState) {
        super.onCreate(savedInstanceState);
        setContentView(R.layout.main);

        // capture our View elements
        mDateDisplay = (TextView) findViewById(R.id.dateDisplay);
        mPickDate = (Button) findViewById(R.id.pickDate);

        // add a click listener to the button
        mPickDate.setOnClickListener(new View.OnClickListener() {
            public void onClick(View v) {
                showDialog(DATE_DIALOG_ID);
            }
        });

        // get the current date
        final Calendar c = Calendar.getInstance();
        mYear = c.get(Calendar.YEAR);
        mMonth = c.get(Calendar.MONTH);
        mDay = c.get(Calendar.DAY_OF_MONTH);

        // display the current date (this method is below)
        updateDisplay();
    }
First, the content is set to the main.xml layout. Then the {@link
android.widget.TextView} and {@link android.widget.Button} elements are captured from the layout
with {@link android.app.Activity#findViewById(int)}. A
new {@link android.view.View.OnClickListener} is created for the
{@link android.widget.Button}, so that when it is clicked, it
will call {@link android.app.Activity#showDialog(int)}, passing the unique integer ID for
the date picker dialog. Using {@link android.app.Activity#showDialog(int)} allows the {@link
android.app.Activity} to manage the life-cycle of the dialog and will call the {@link
android.app.Activity#onCreateDialog(int)} callback method to request the {@link android.app.Dialog}
that should be displayed (which you'll
define later). After the on-click listener is set, a new {@link java.util.Calendar} is created
and the current year, month and day are acquired. Finally, the private
updateDisplay() method is called in order to fill the {@link android.widget.TextView}
with the current date.
updateDisplay() method:
    // updates the date in the TextView
    private void updateDisplay() {
        mDateDisplay.setText(
            new StringBuilder()
                    // Month is 0 based so add 1
                    .append(mMonth + 1).append("-")
                    .append(mDay).append("-")
                    .append(mYear).append(" "));
    }
This method uses the member date values declared for the class to write the date to the layout's {@link android.widget.TextView}, {@code mDateDisplay}, which was also declared and initialized above.
HelloDatePicker class:
    // the callback received when the user "sets" the date in the dialog
    private DatePickerDialog.OnDateSetListener mDateSetListener =
            new DatePickerDialog.OnDateSetListener() {

                public void onDateSet(DatePicker view, int year,
                                      int monthOfYear, int dayOfMonth) {
                    mYear = year;
                    mMonth = monthOfYear;
                    mDay = dayOfMonth;
                    updateDisplay();
                }
            };
The {@link android.app.DatePickerDialog.OnDateSetListener} listens for when the user
has set the date (by clicking the "Set" button). At that time, the {@link
android.app.DatePickerDialog.OnDateSetListener#onDateSet(DatePicker,int,int,int) onDateSet()}
callback method is called, which is defined to update the {@code mYear}, {@code mMonth}, and
{@code mDay} member fields with the new date then call the private updateDisplay()
method to update the {@link android.widget.TextView}.
@Override
protected Dialog onCreateDialog(int id) {
    switch (id) {
    case DATE_DIALOG_ID:
        return new DatePickerDialog(this,
                    mDateSetListener,
                    mYear, mMonth, mDay);
    }
    return null;
}
This is an {@link android.app.Activity} callback method that is passed the integer ID given to {@link android.app.Activity#showDialog(int)} (which is called by the button's {@link android.view.View.OnClickListener}). When the ID matches the switch case defined here, a {@link android.app.DatePickerDialog} is instantiated with the {@link android.app.DatePickerDialog.OnDateSetListener} created in the previous step, along with the date variables to initialize the widget date.
When you press the "Change the date" button, you should see the following:
